How To Make Bone Broth in the Oven / Oven Bone Broth Recipe
RECOMMENDED: READ RECIPE NOTES BEFORE YOU BEGIN!
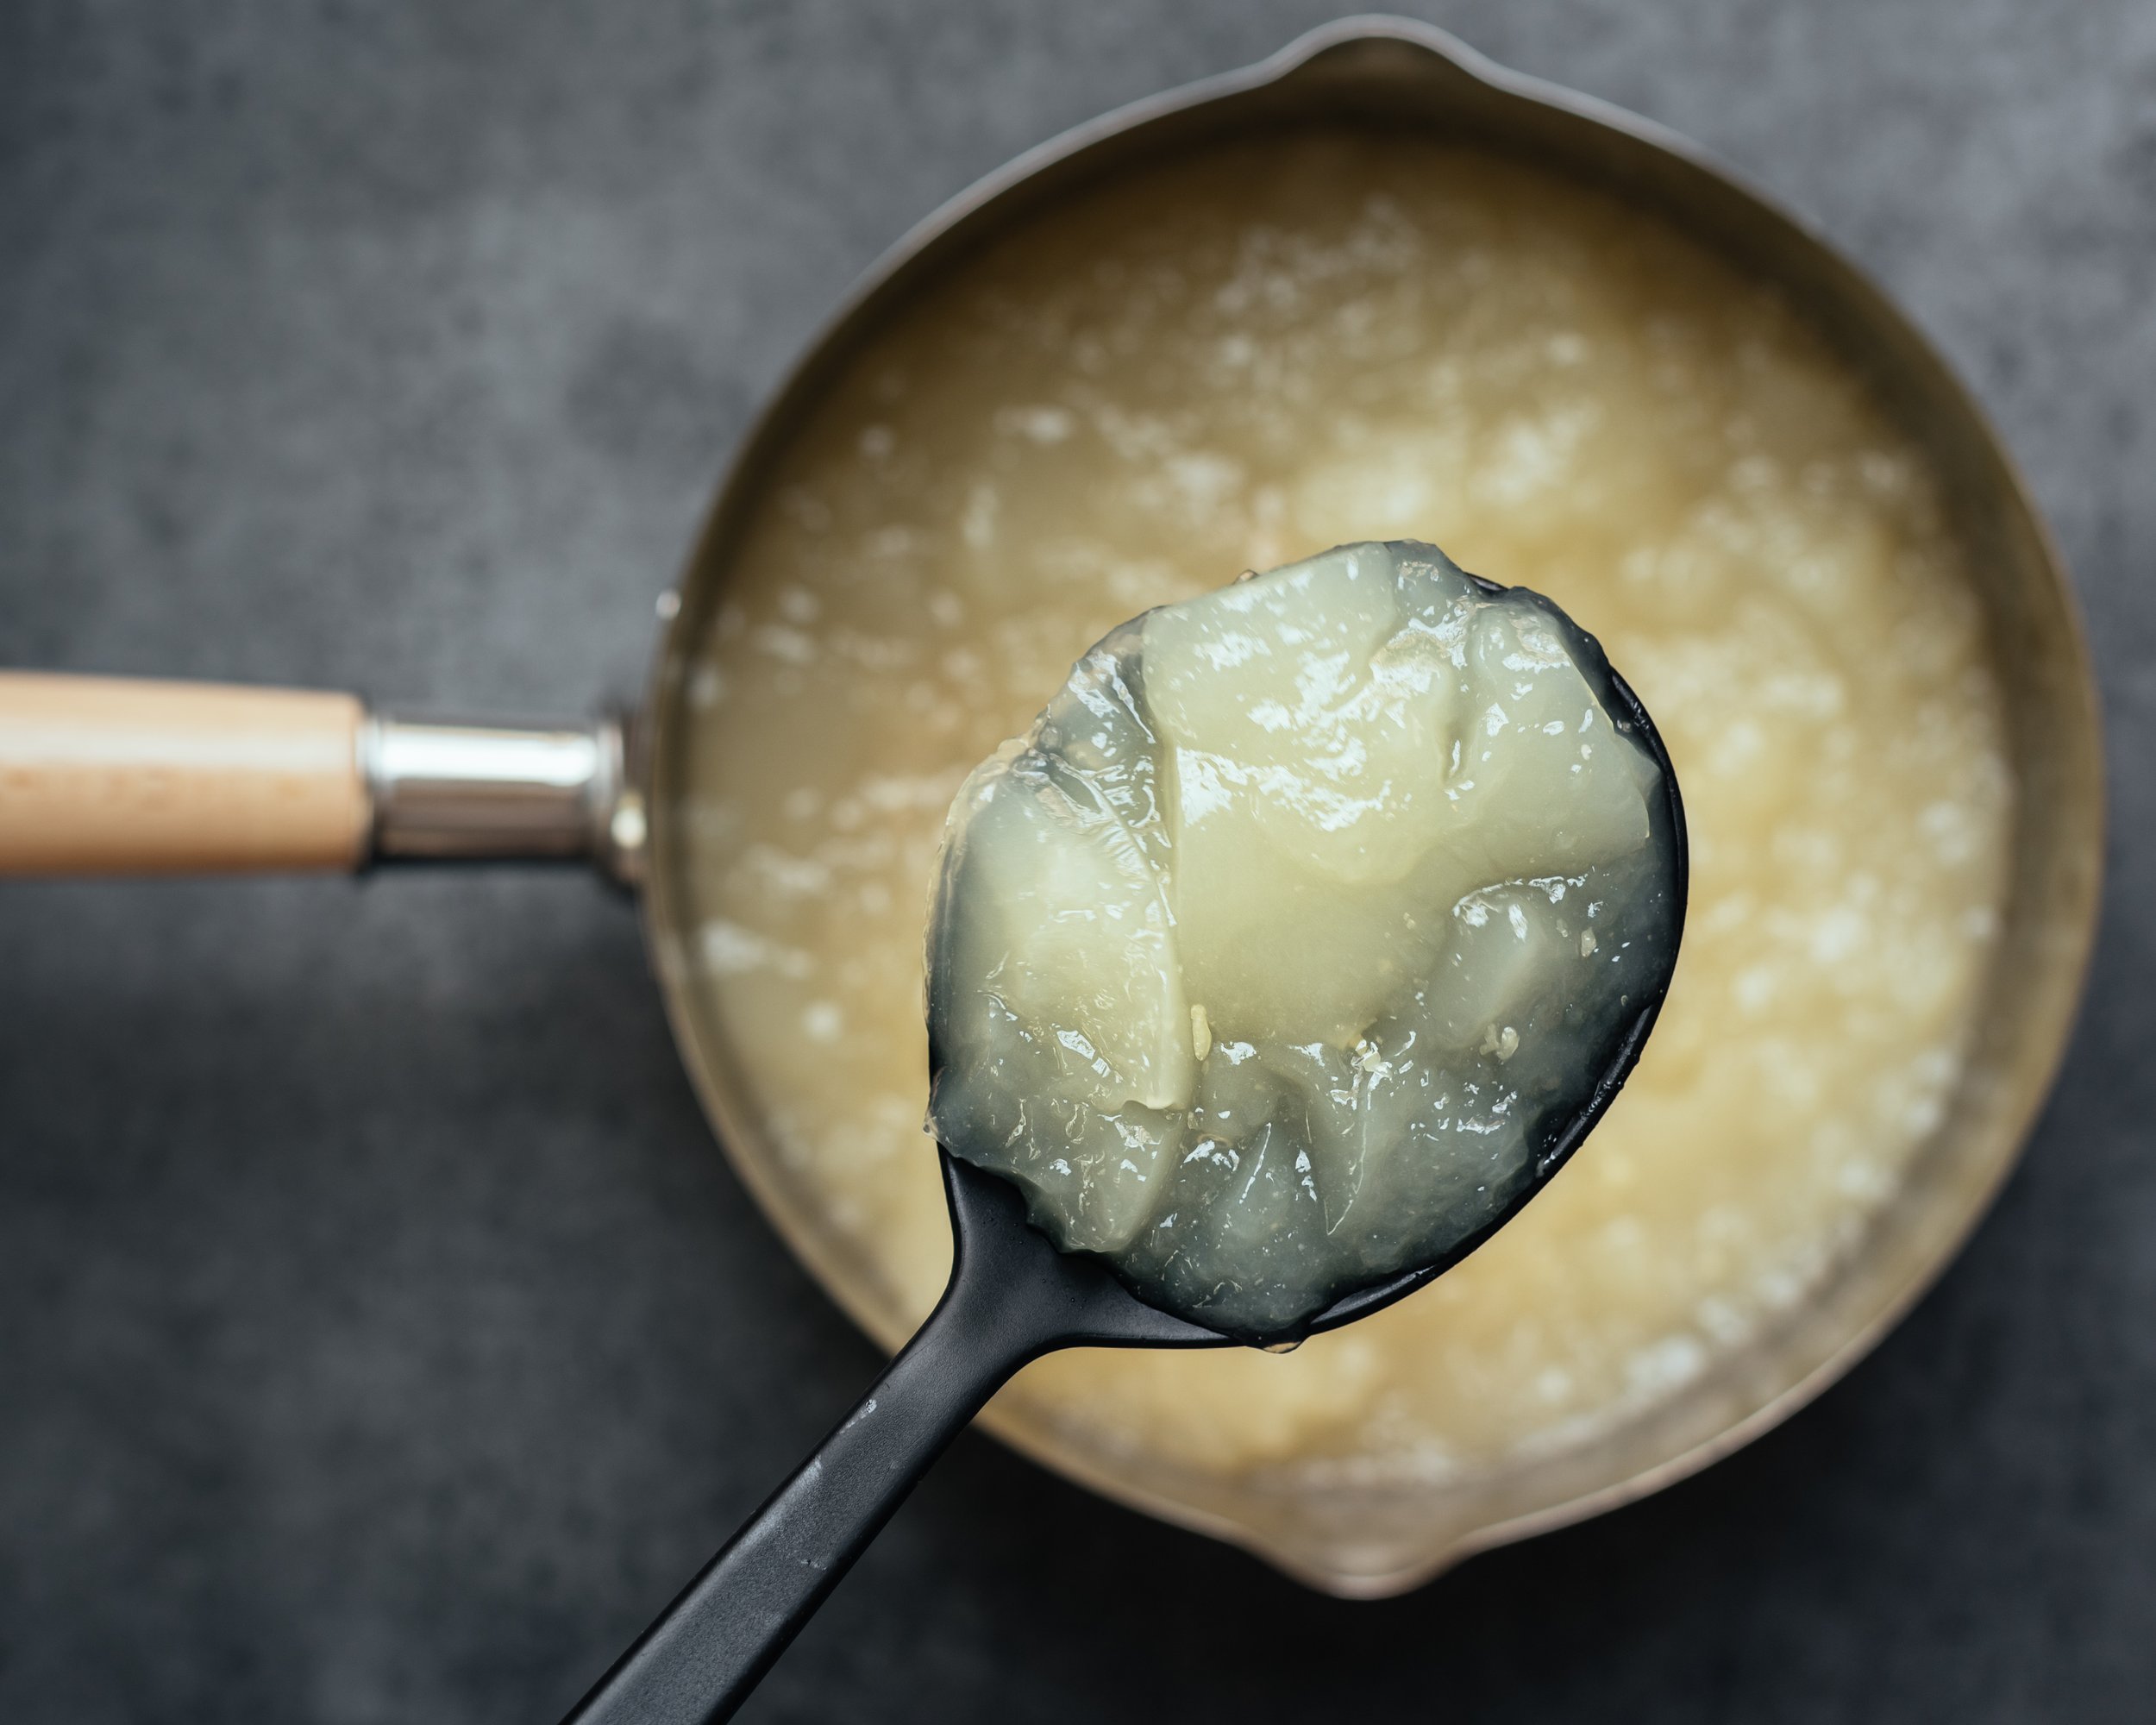
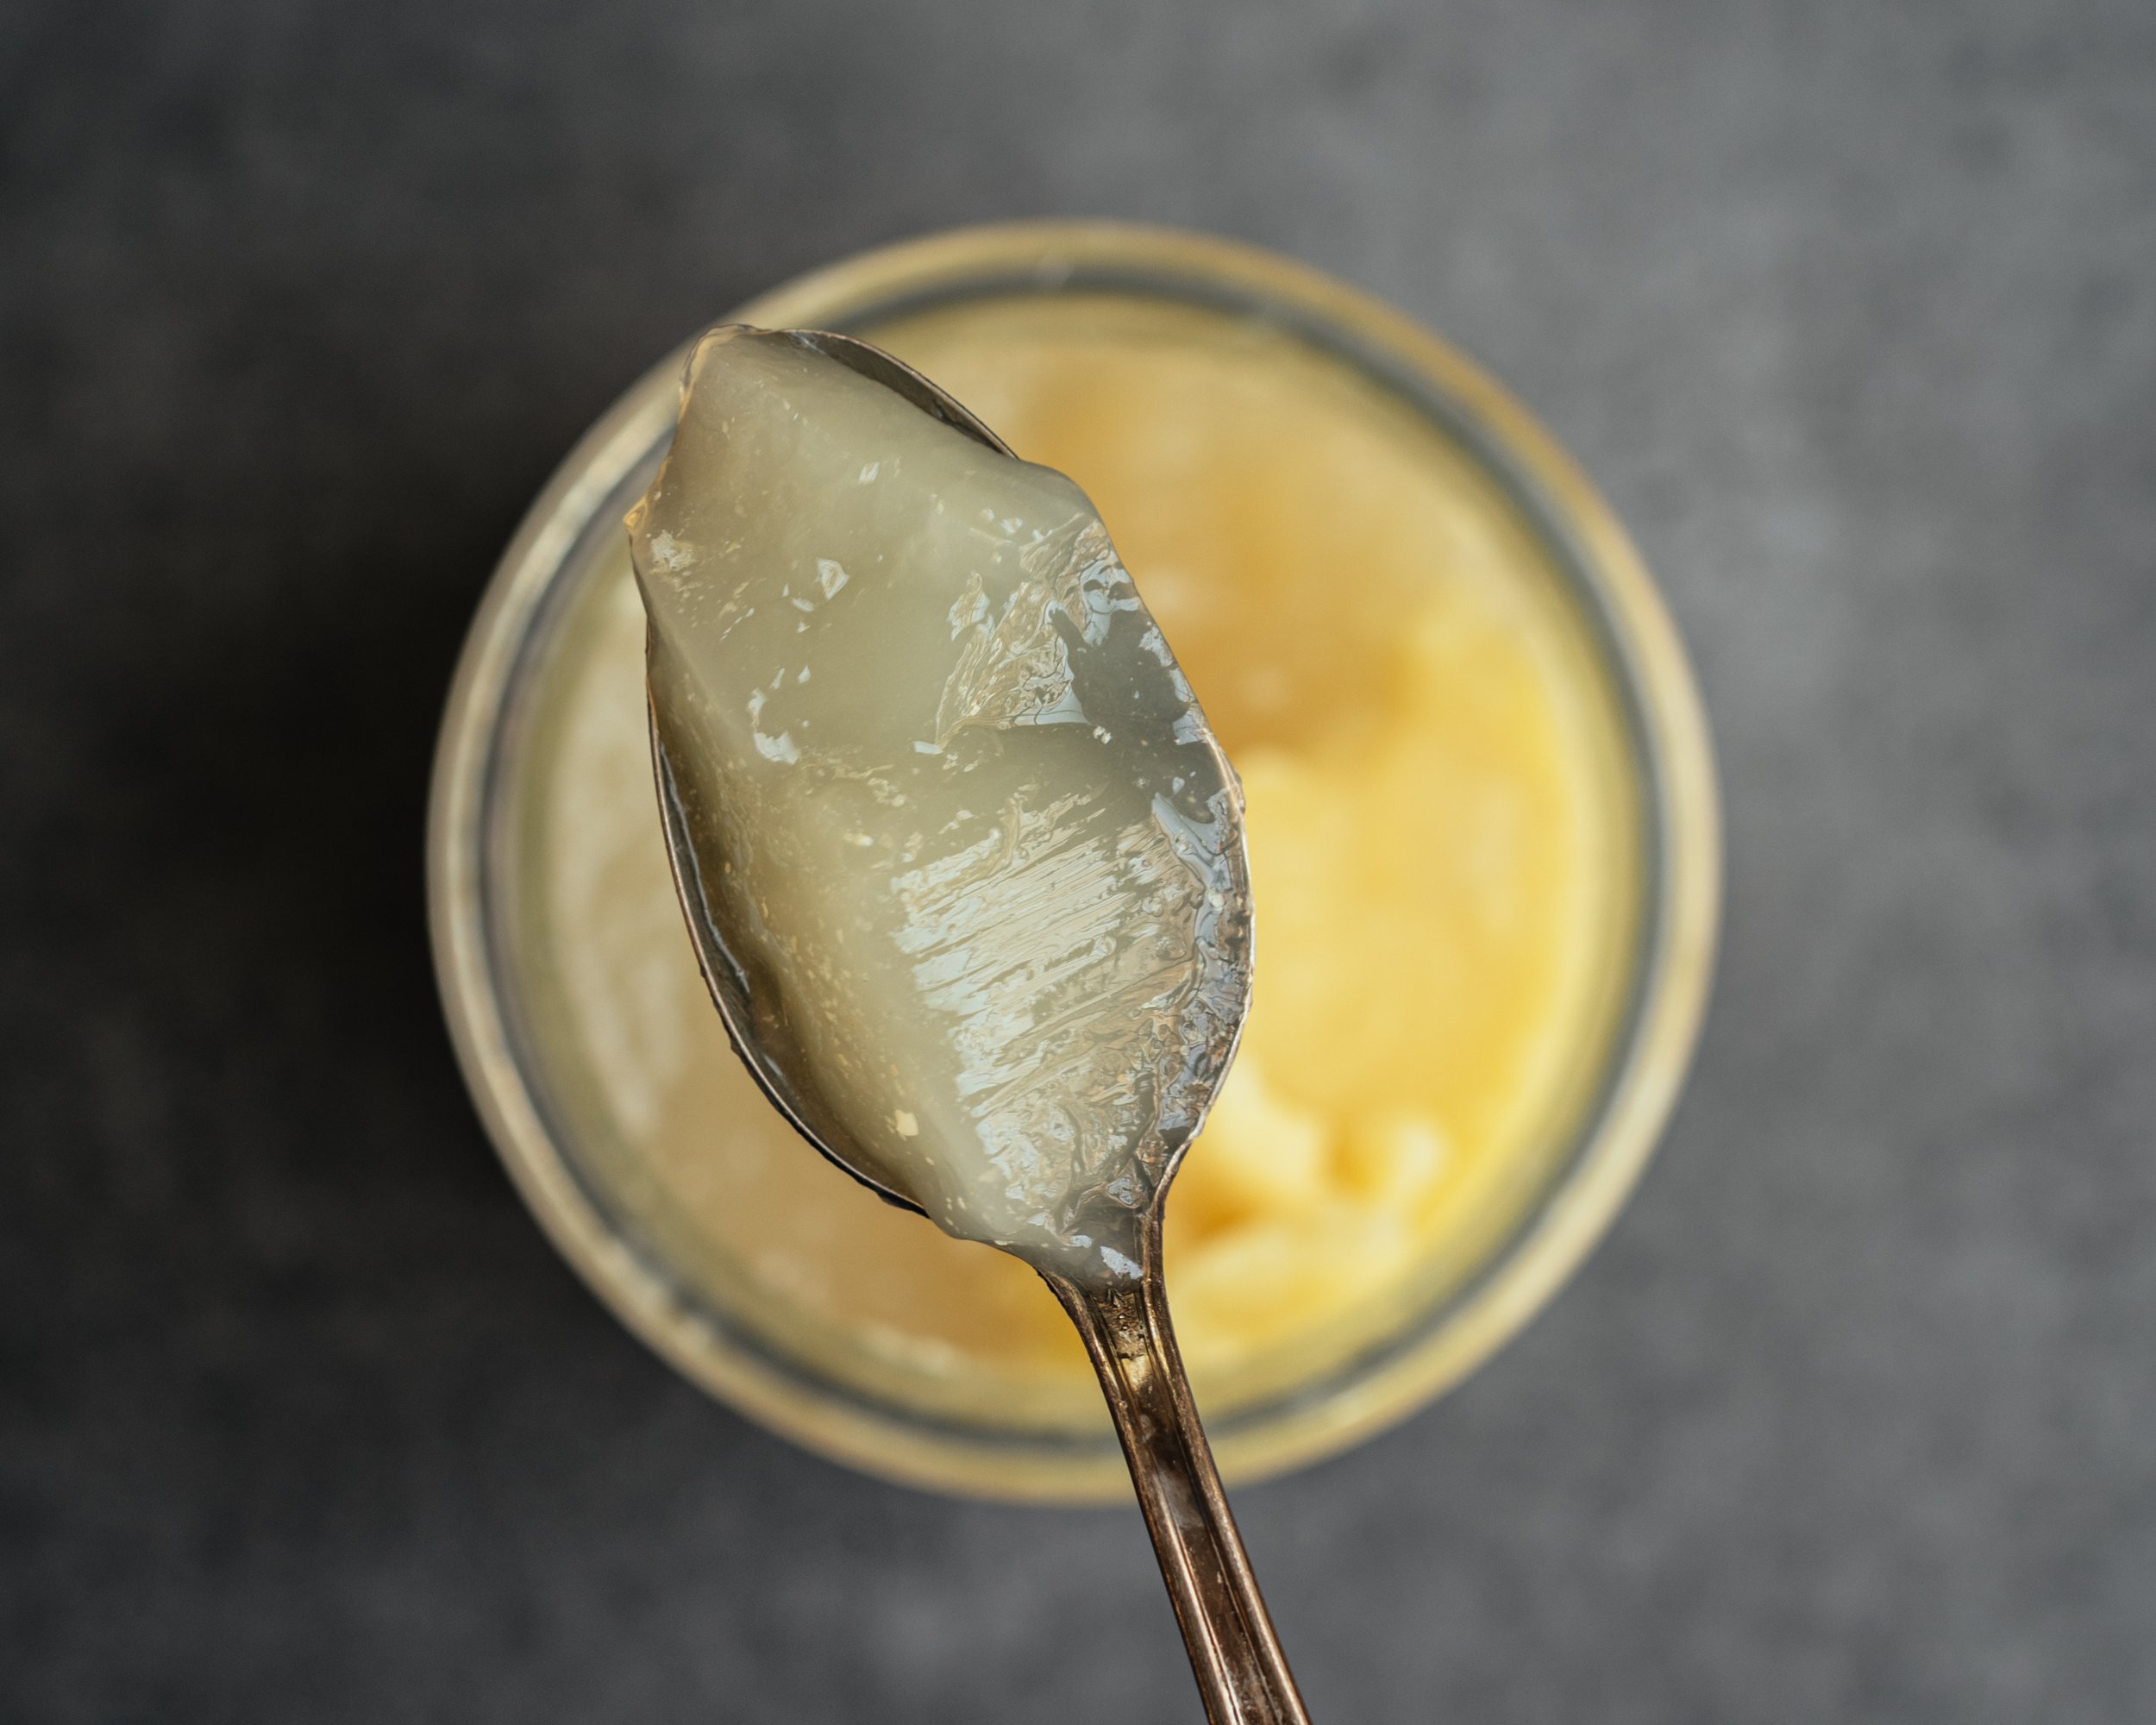
The proof is in the jello! I am sharing my favourite NO FAIL method to get bouncy bone broth jello every time — cook bone broth in a SUPER-LOW OVEN 🤯

MY LATEST VIDEOS
next
stay
What’s more, I use relatively accessible parts like chicken backs, necks, carcasses and/or leg bones which you can easily get from a butcher or save from your home cooked meals. No chicken feet. Which I’m going to assume is a relief for many people lol. I’m Chinese and used to eating chicken feet at dim sum but I don’t usually use them in my home made bone broth either. But you do you! This OVEN BONE BROTH RECIPE is your ticket to gelatinous glory and deeply savoury, flavourful broth to sip or create meals with.
I’ve been making bone broth for 6 years using stove top and Instant Pot methods but I didn’t always get very firm jello. In the controlled, super-low temperature of the oven, I never risk over boiling and melting the collagen. For some reason, cooking bone broth in the oven isn’t at least as popular as the other methods (i.e. stove top, pressure cooker, slow cooker), which really surprises me!?! This method for OVEN BONE BROTH RECIPE has been fail proof for me and I am confident it will be the same for you.
Please read through my FAQs and Recipe Notes before starting and as always, let me know if you have any questions in the comment section. Check out my video below to see that glorious bone broth jiggle 🤩
Eat well and be well,

🎥 Watch video for Oven Bone Broth Recipe
Steps at a glance:
How to make Bone Broth in the Oven (scroll down for full recipe card):
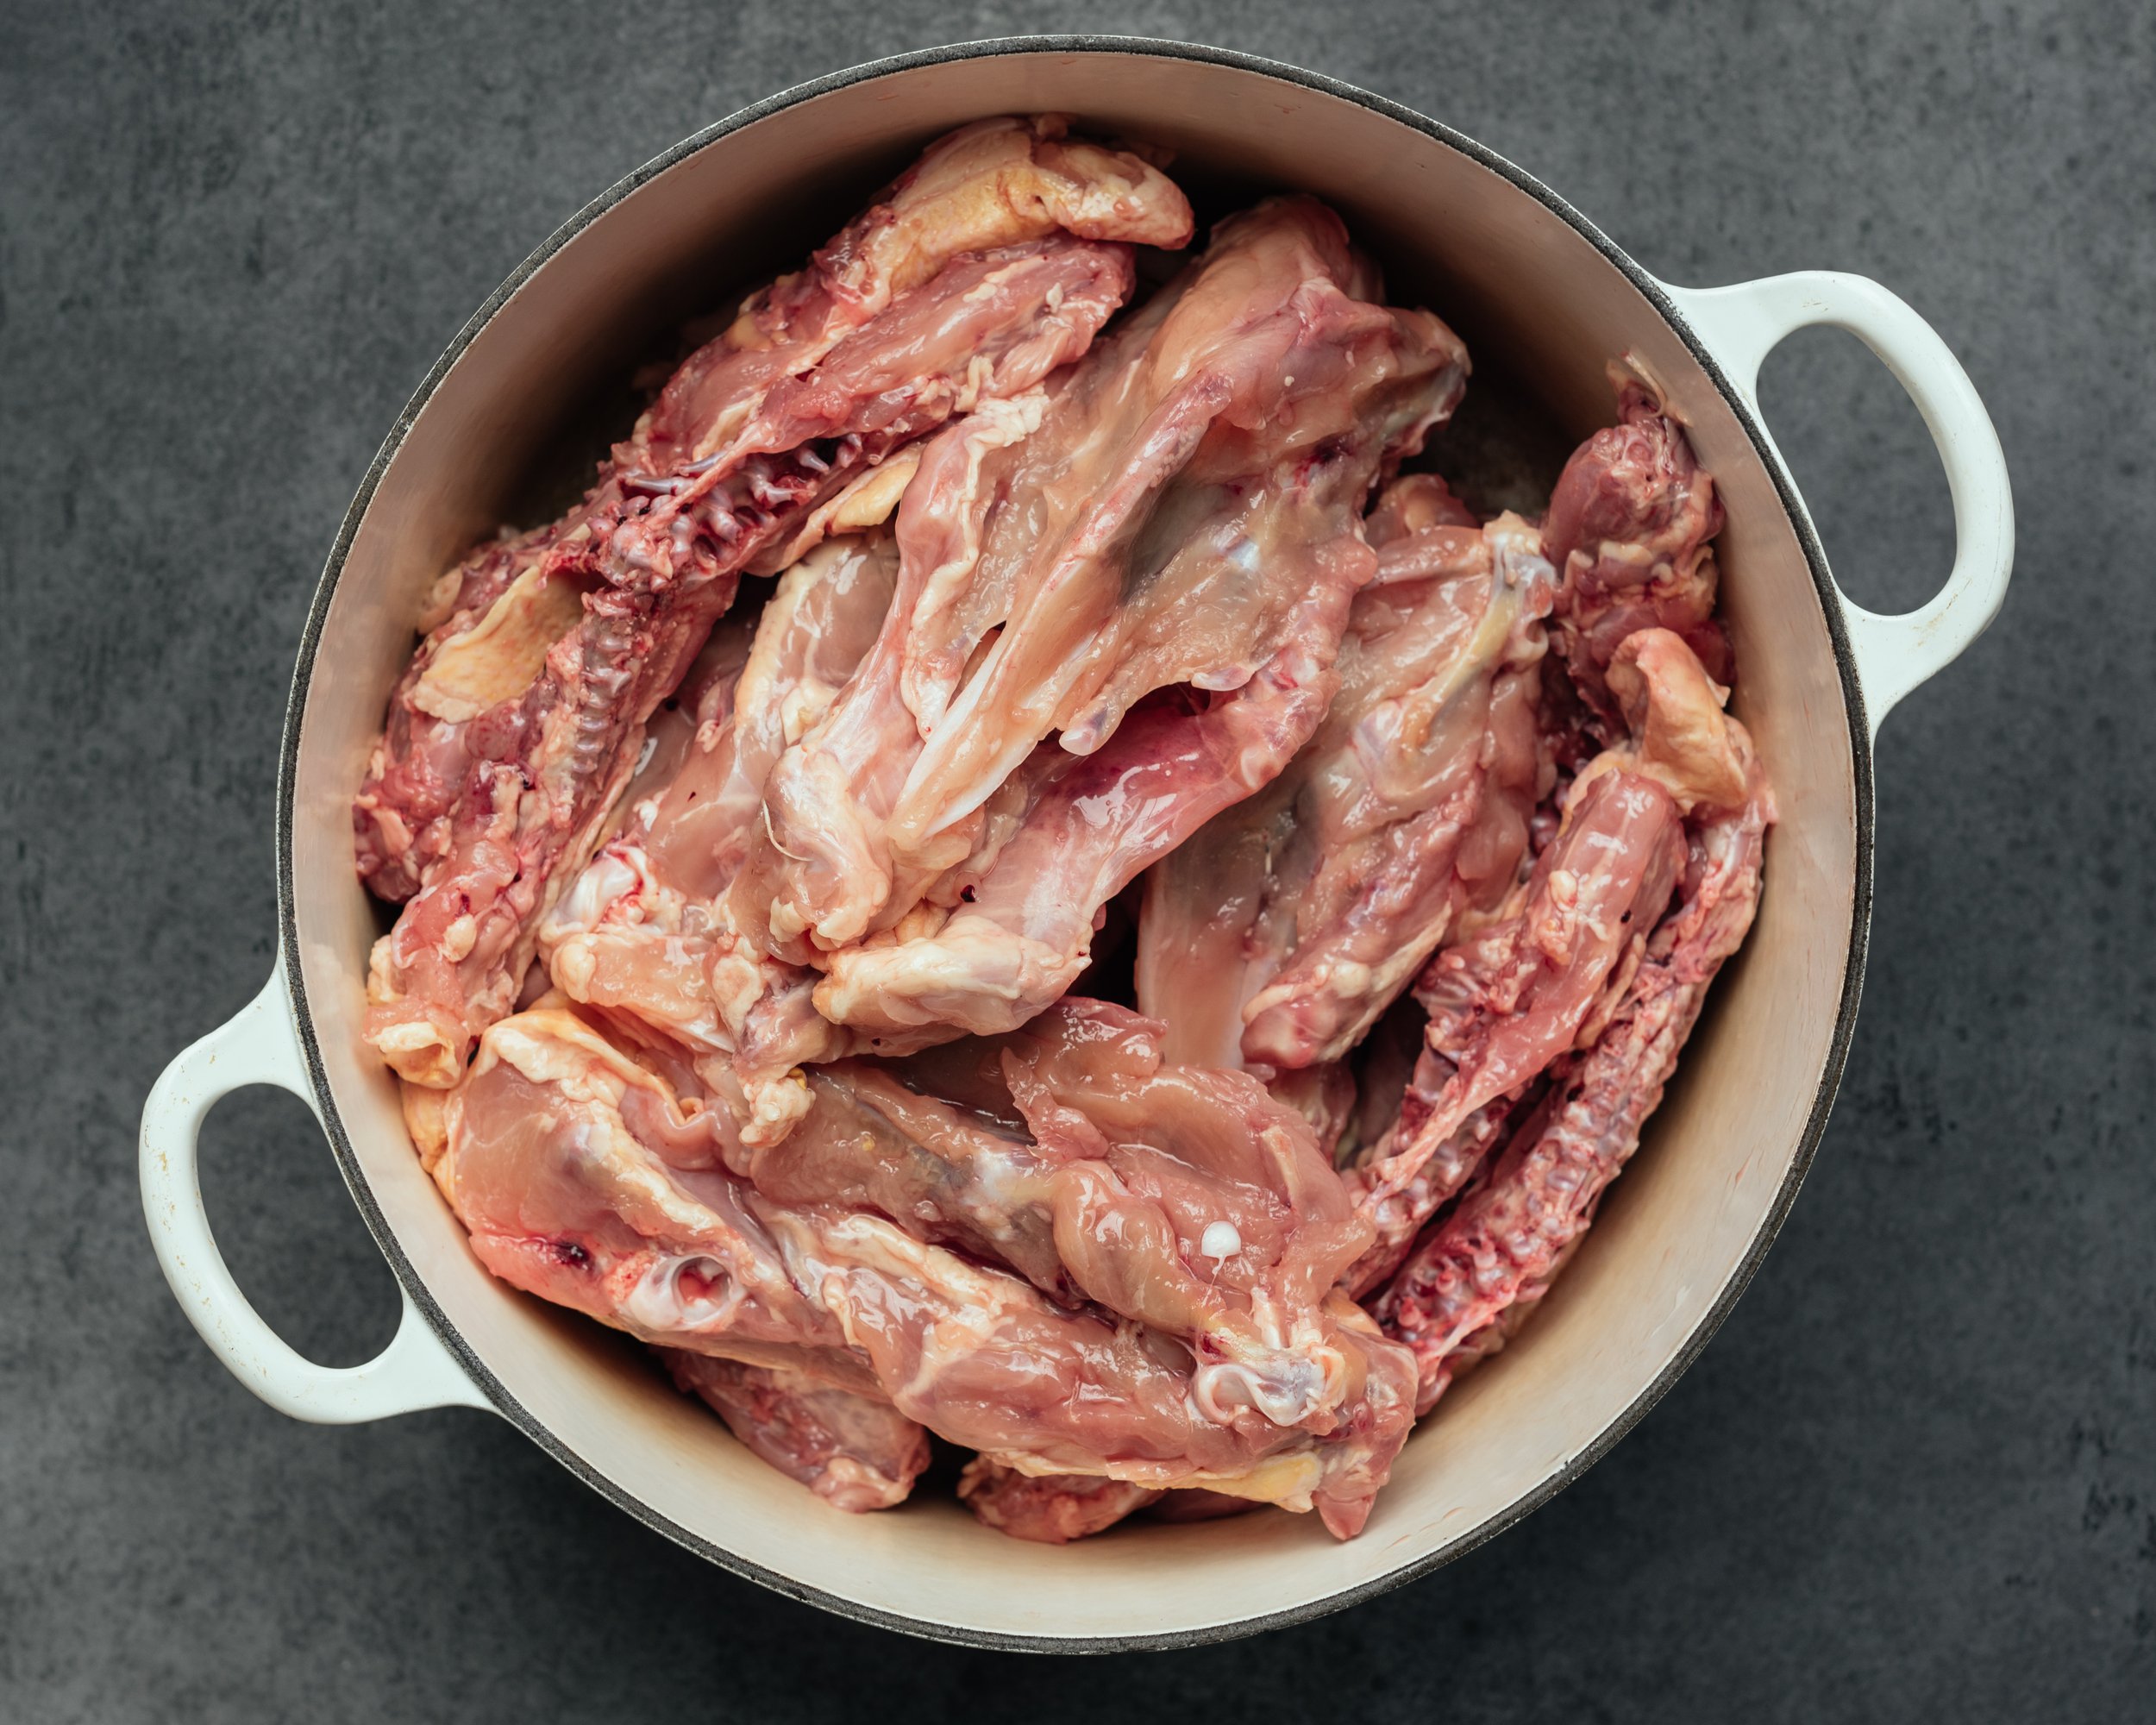
Place bones in a large Dutch oven or heavy-lidded pot
Pictured, I used raw chicken carcasses and backs purchased from a local butcher, plus a few cooked leg bones from the freezer added later when I remembered. No chicken feet for other special parts required unless you so desire 😉 See Recipe Note 2 for more about types of bones to use
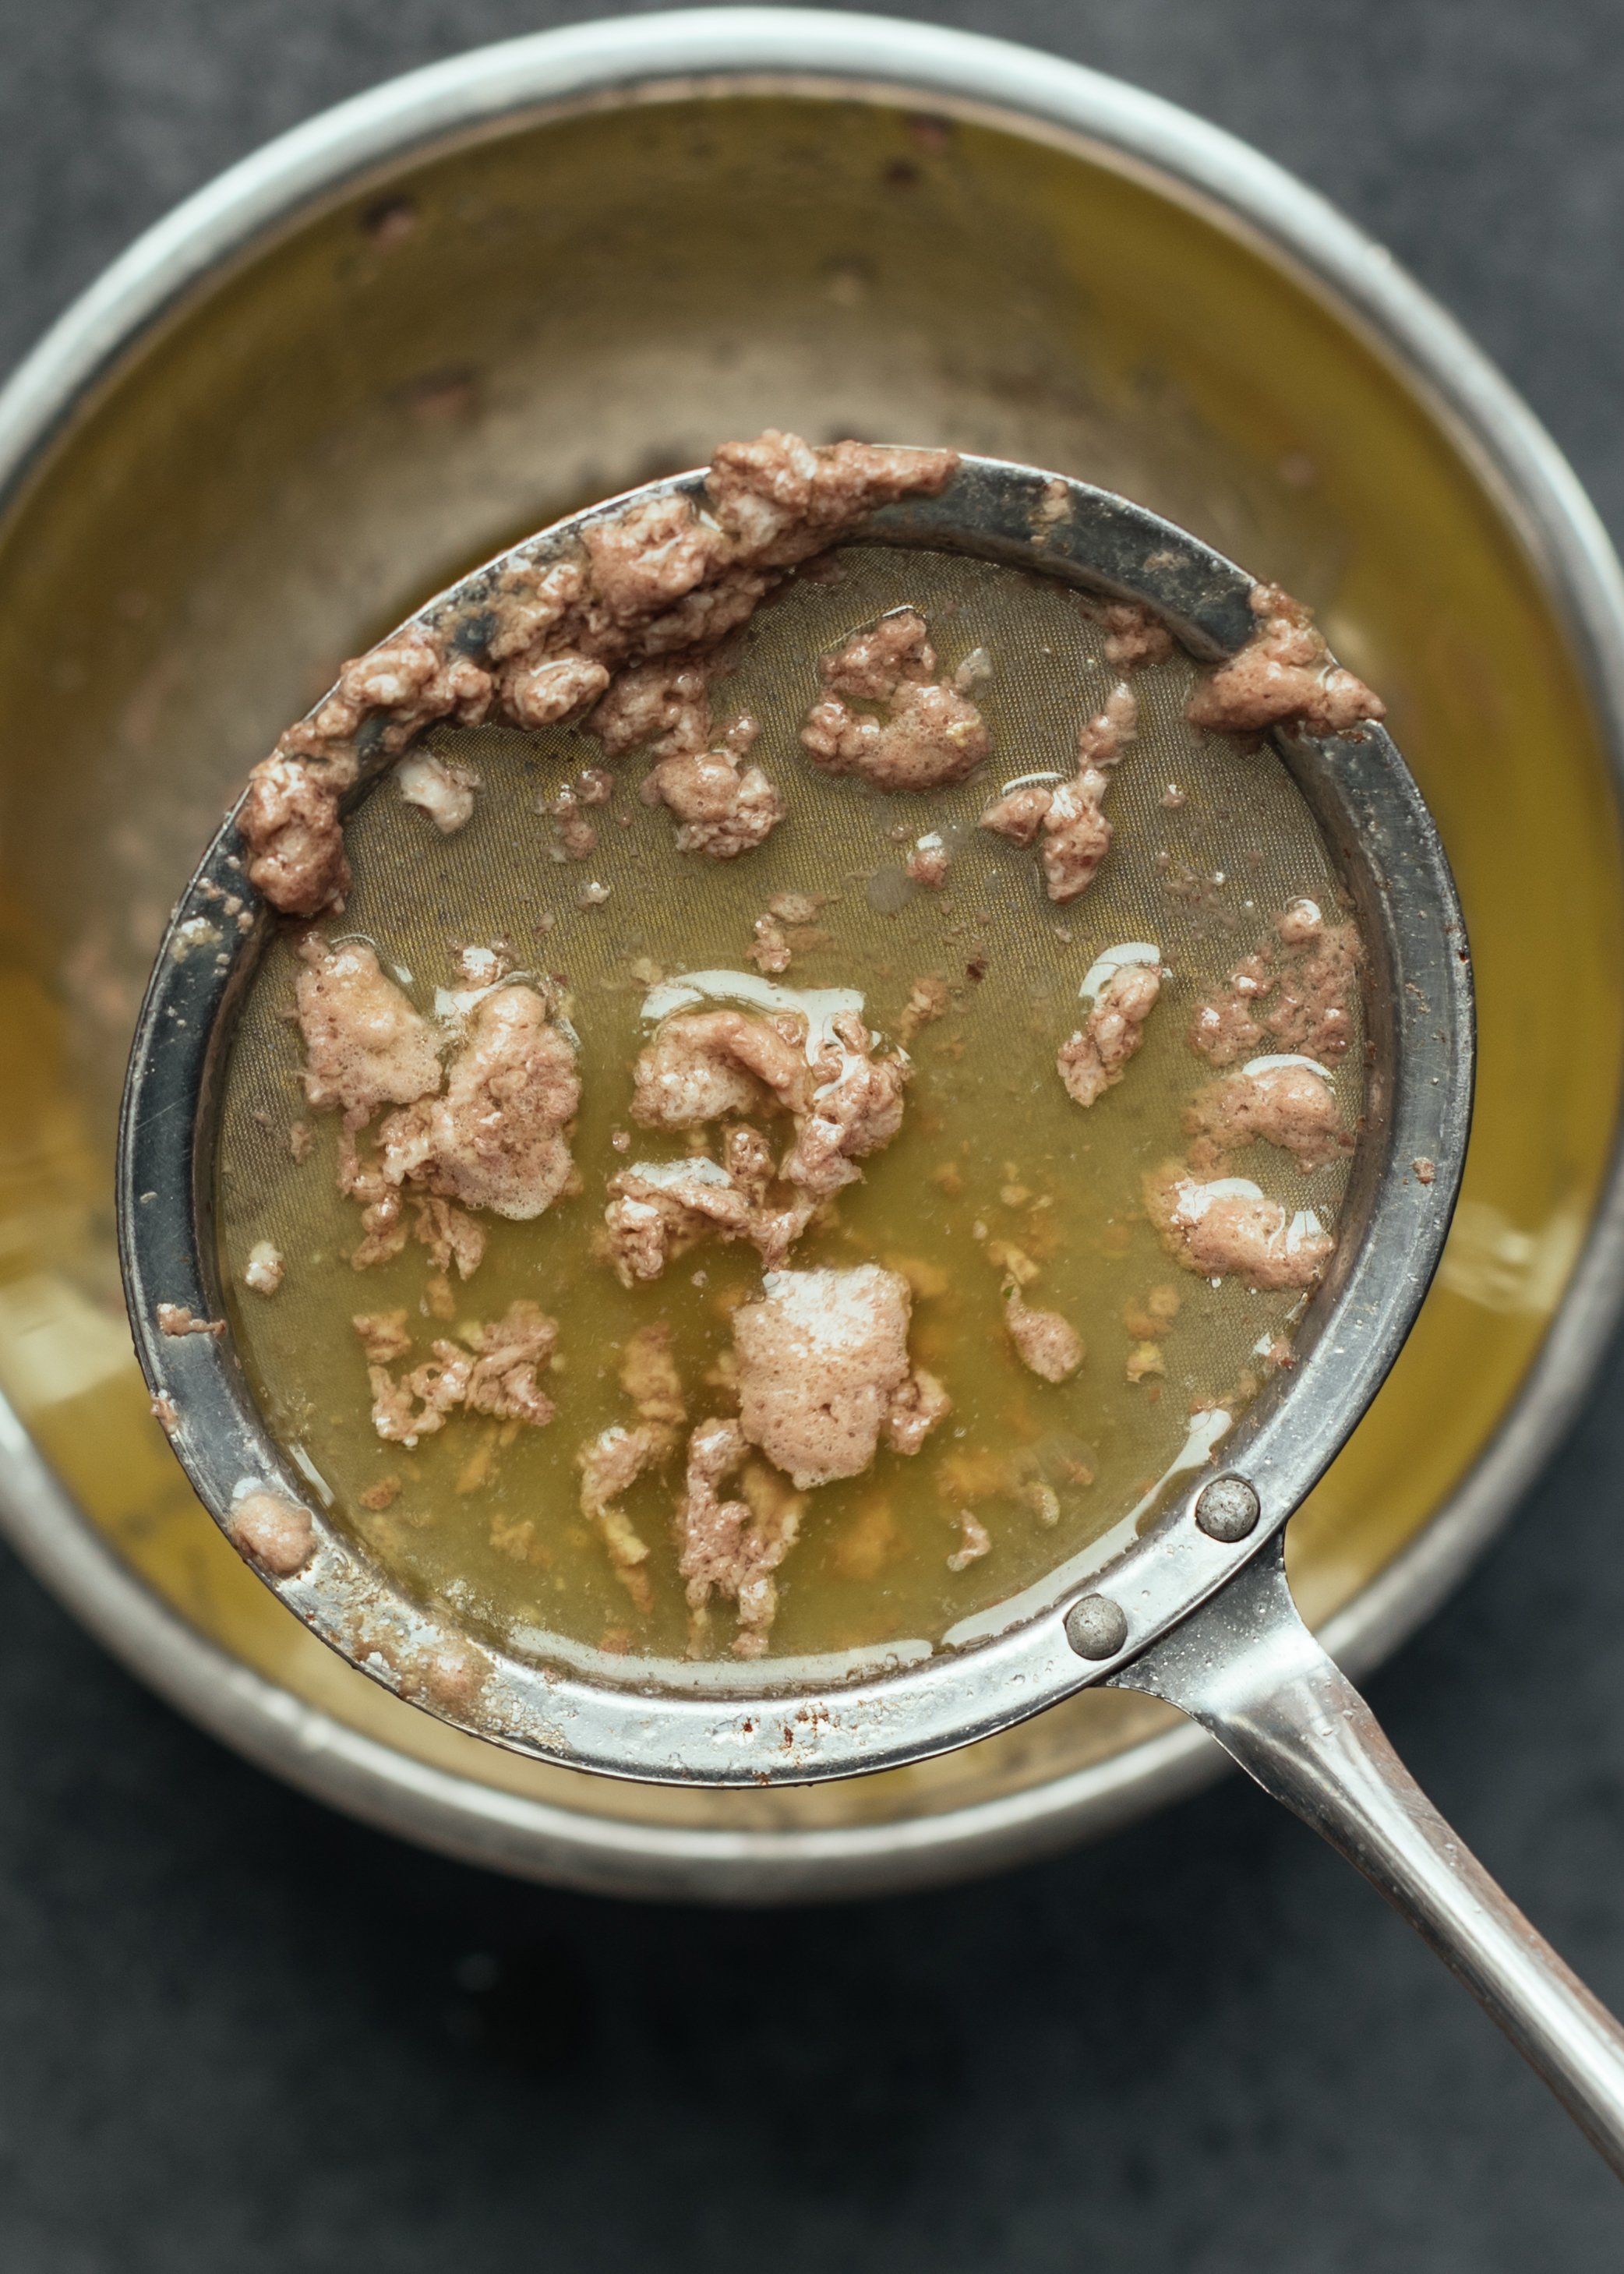
Rid the bones of scum and impurities. I offer two different methods of doing this. See instructions for each option in the recipe card
Option 1: soak/boil/skim
Option 2: boil/dump out
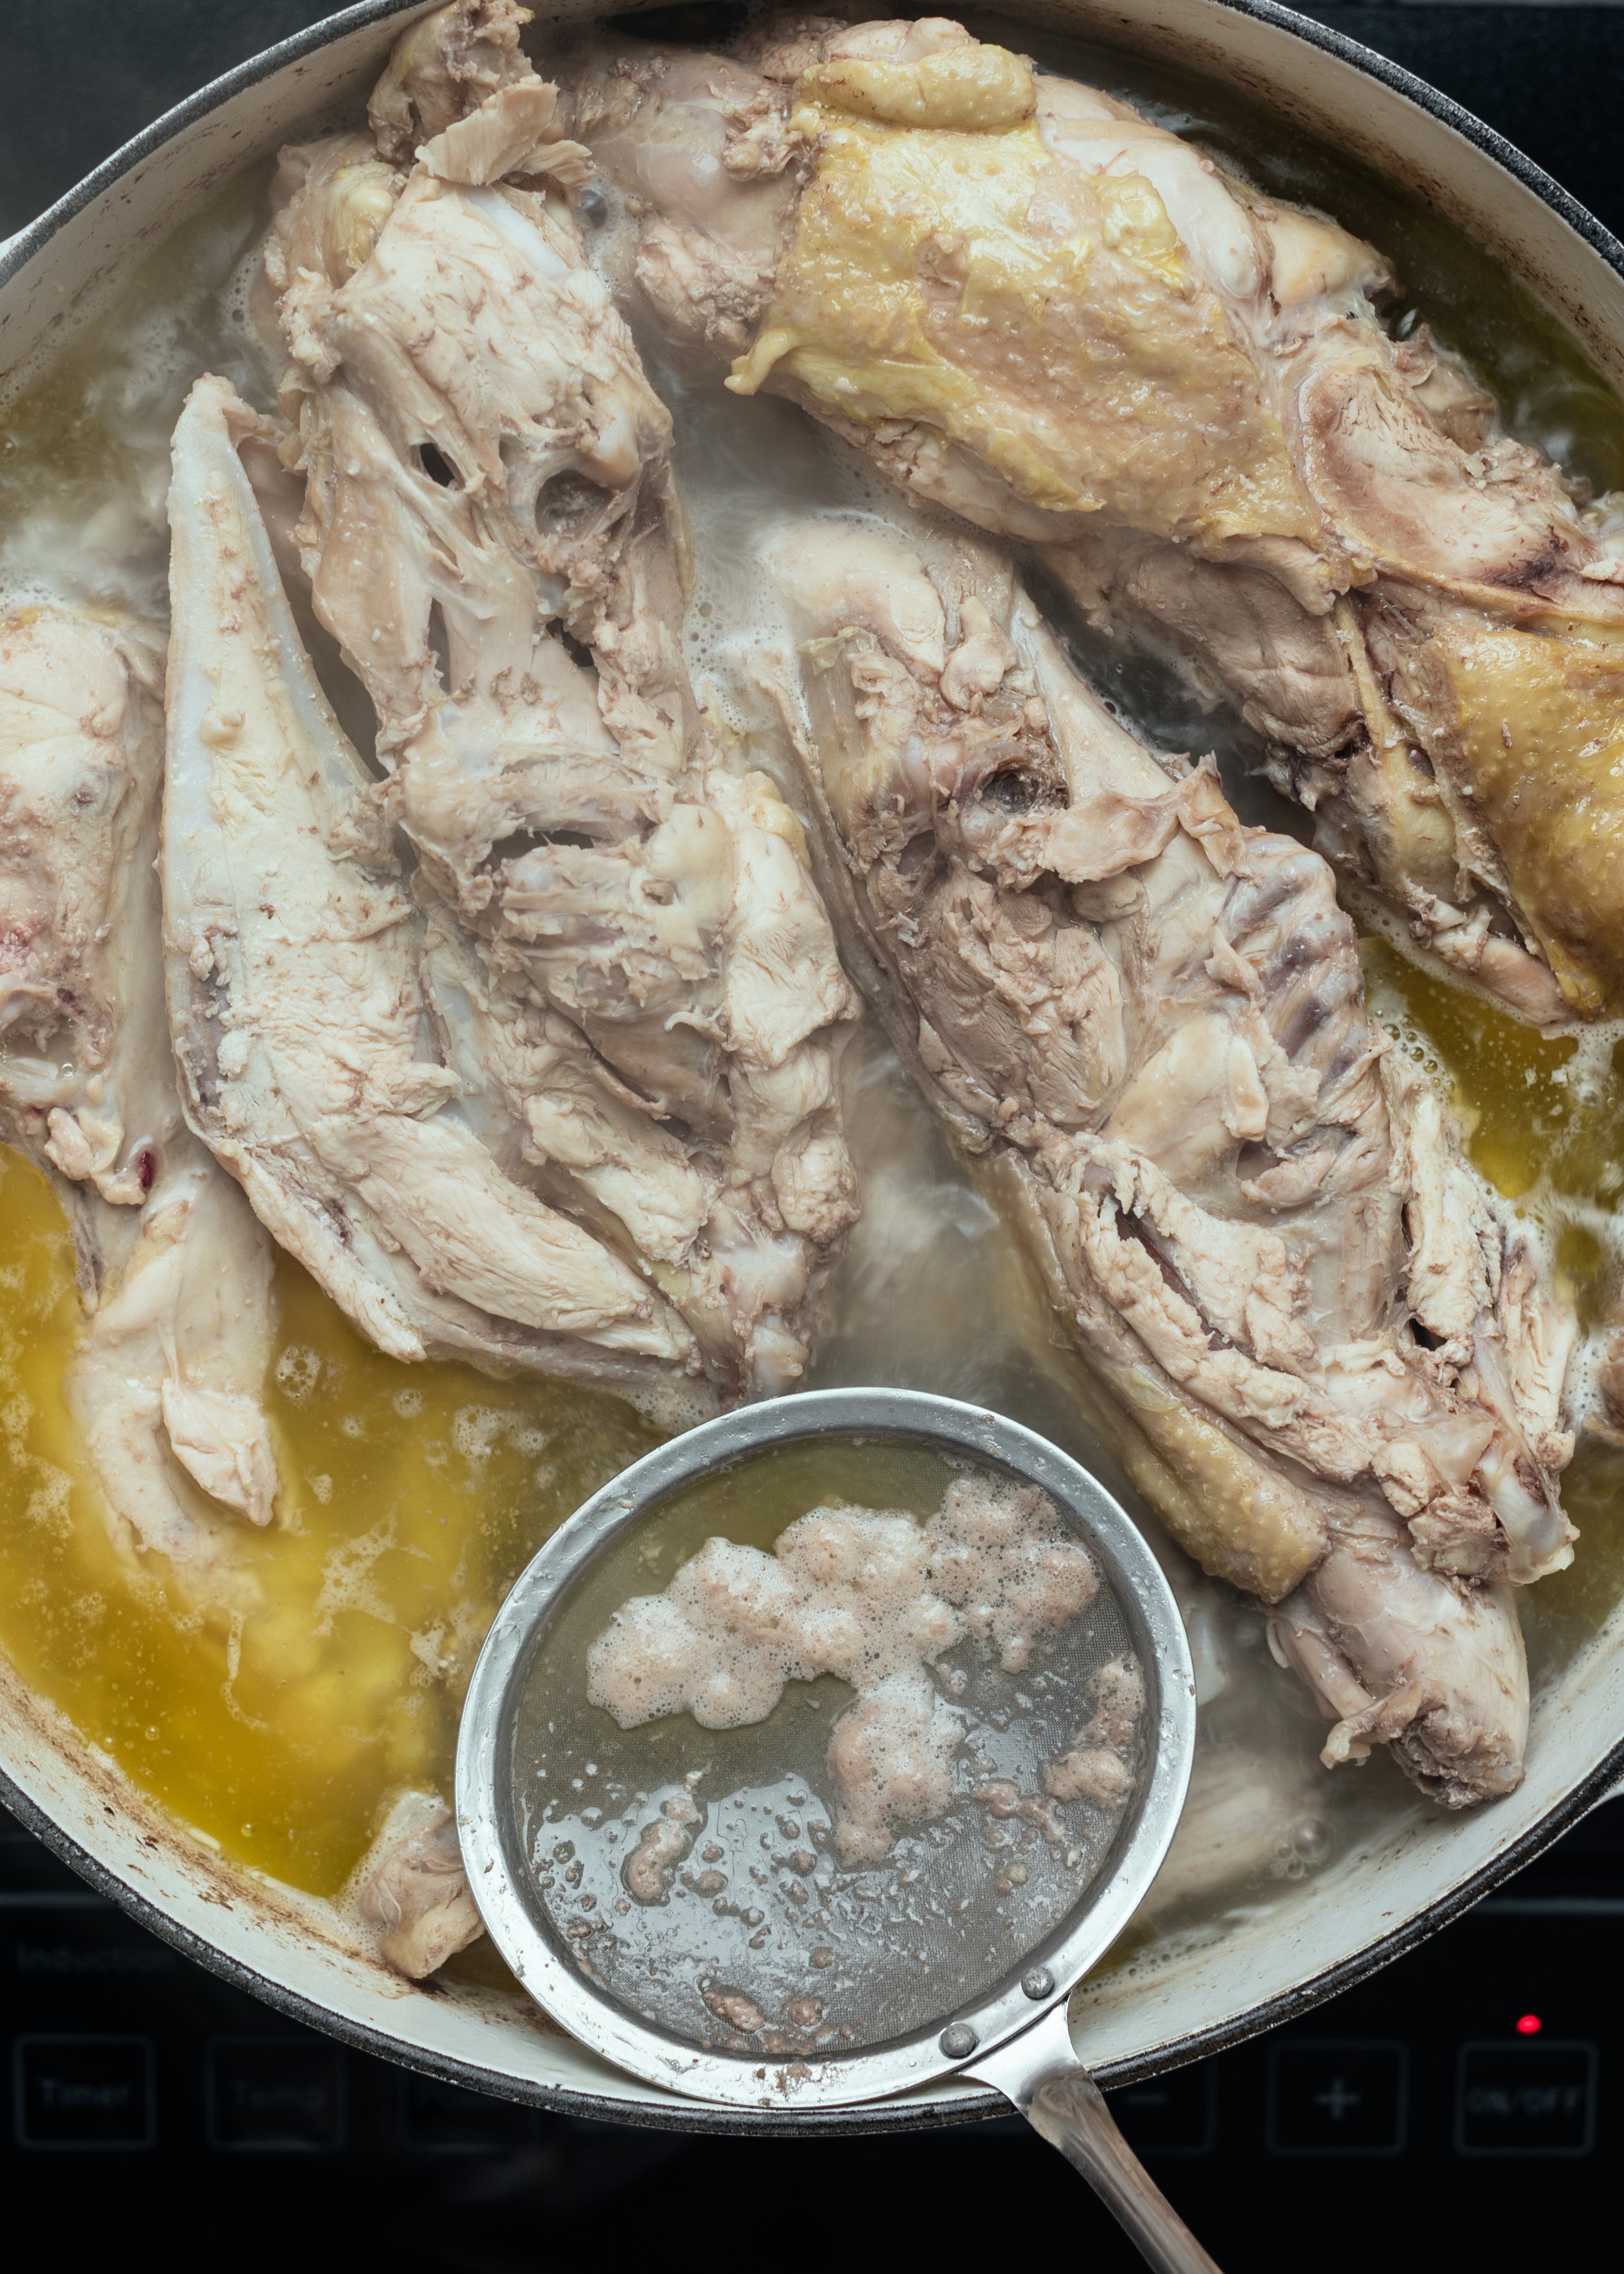
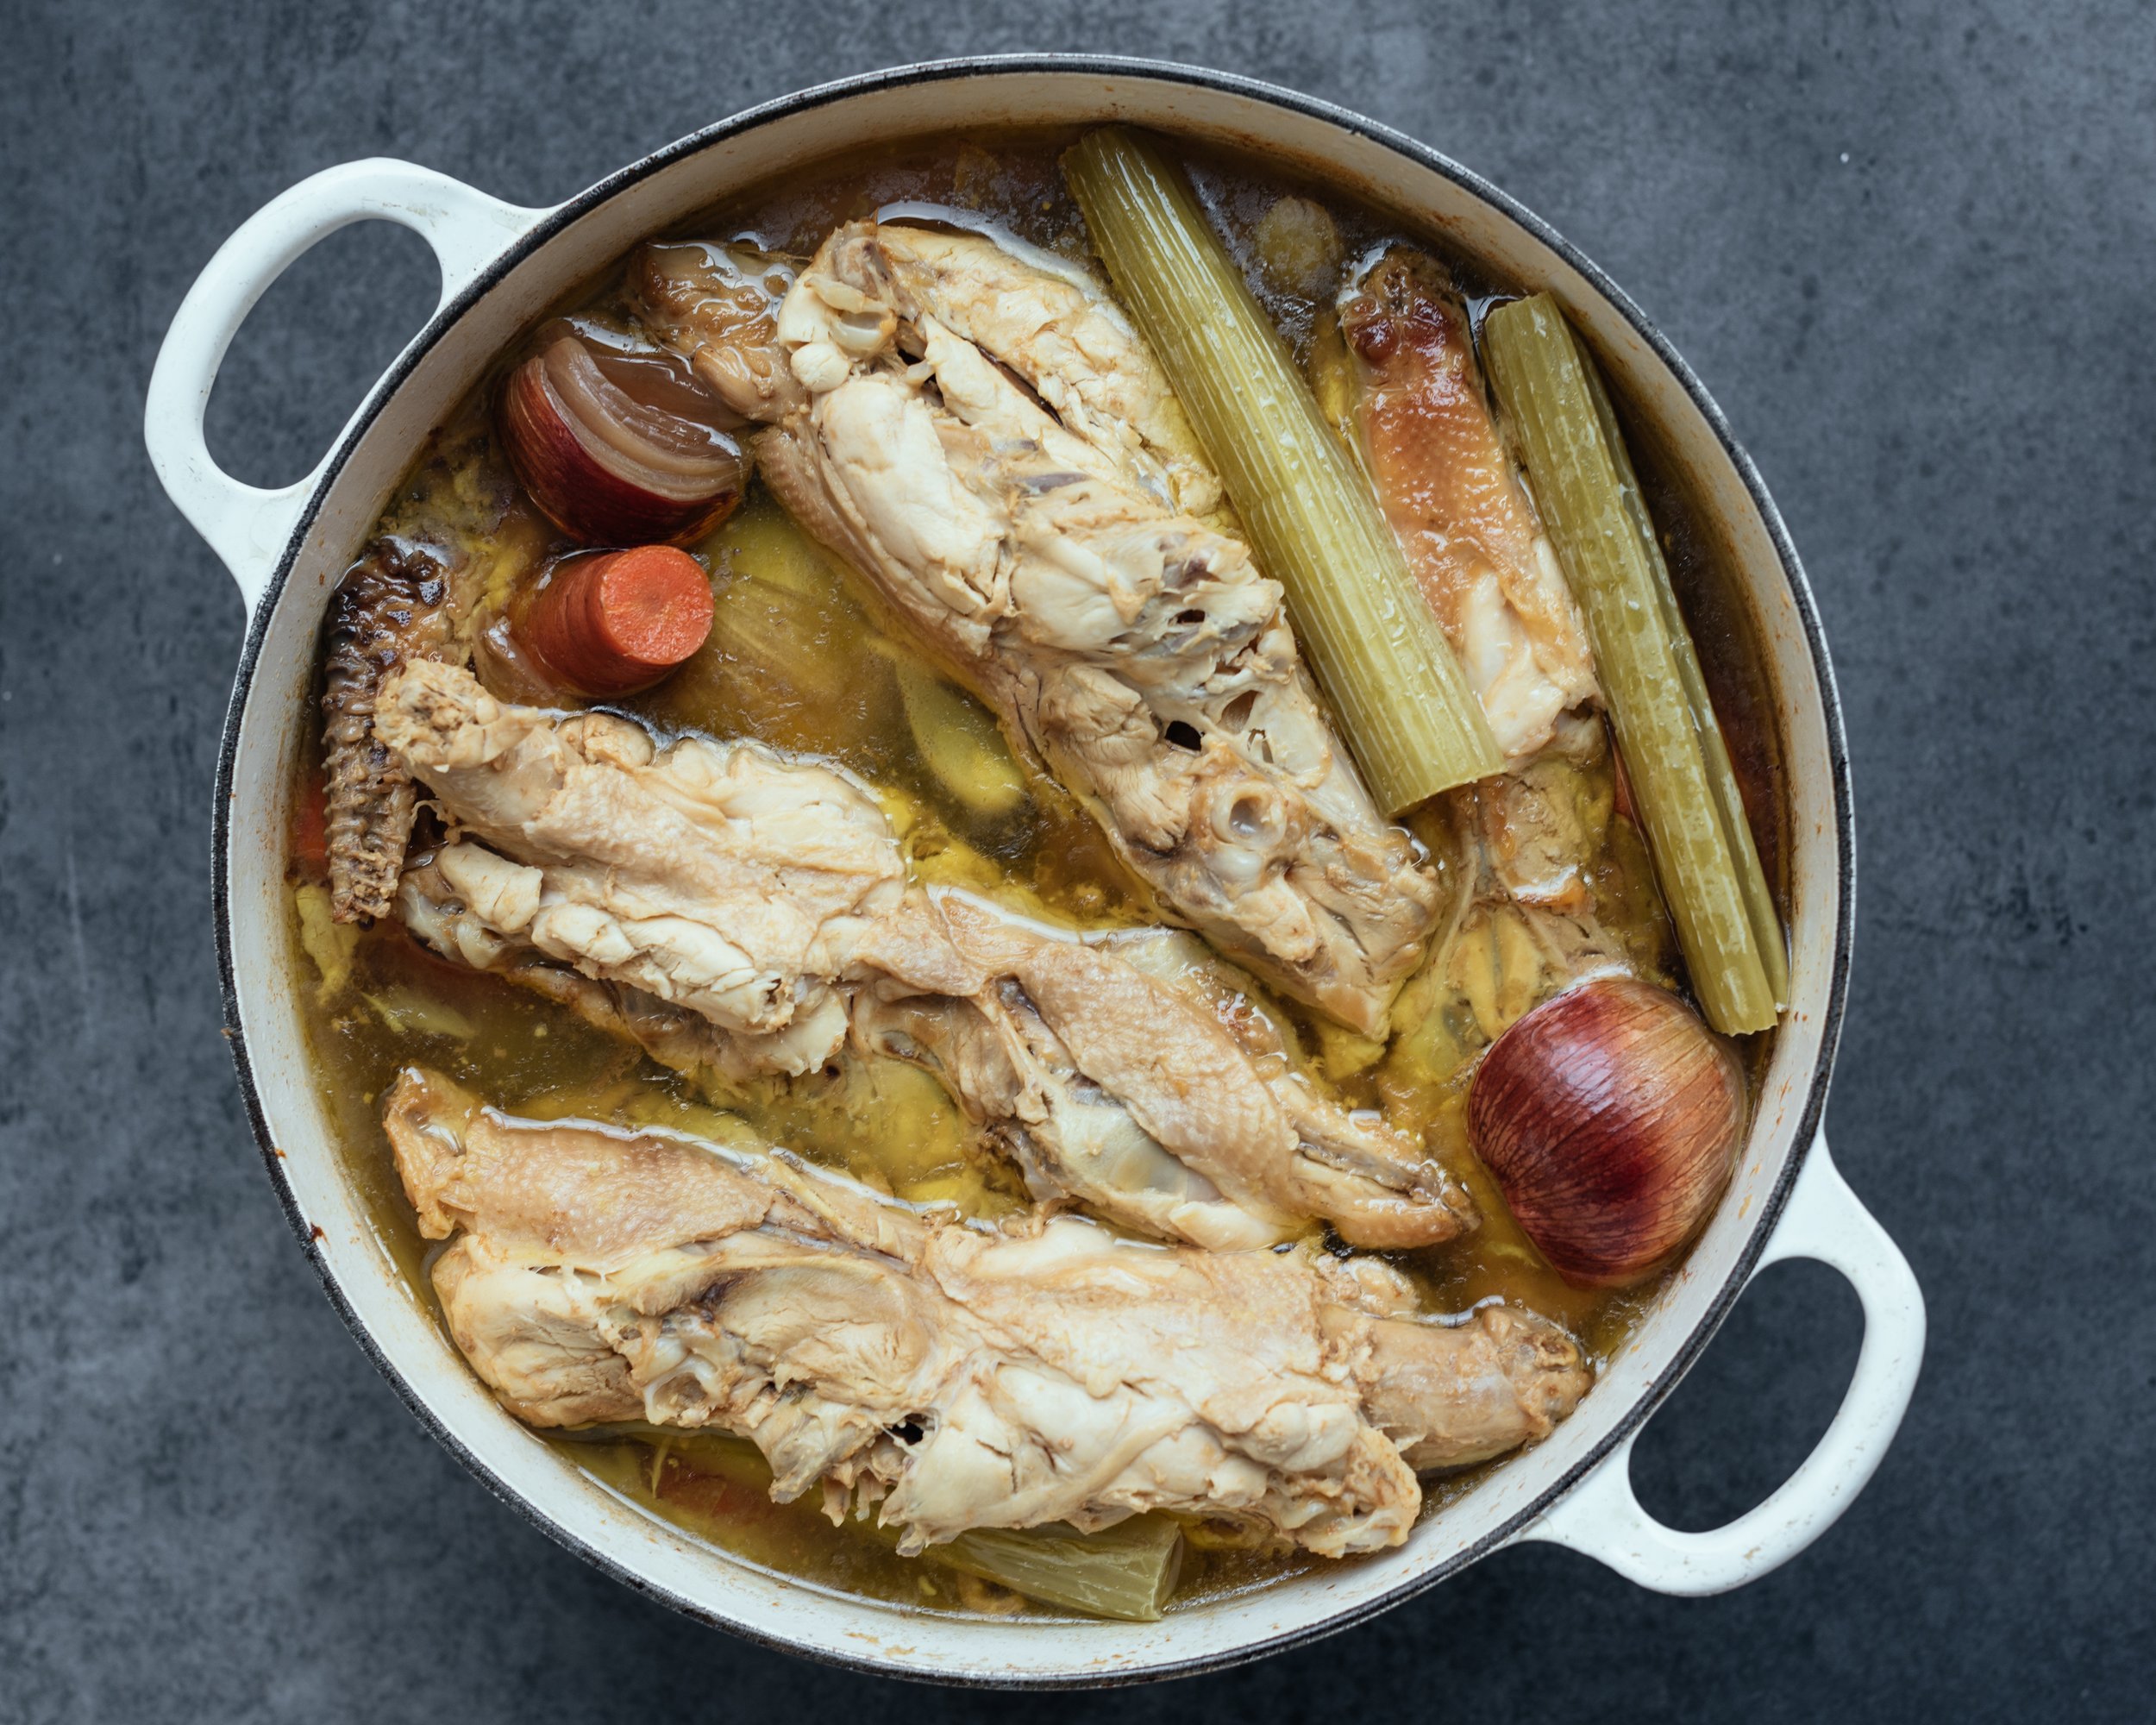
Once the scum is cleared, we add vegetables, garlic, vinegar (if using) and water to the bones, bring it all to a rolling boil, and the pot is ready to head for a long snooze in the 150f /65c oven

Cover and place the pot in the 150 Fahrenheit (65 Celsius) oven. If you’re wondering about the food safety of cooking chicken bone broth at 150f, read the FAQ section below. It is safe.
Cook for anywhere between 12 to 24 hours in the oven. This bone broth was in the oven for 24 hours.
Strain over fine-mesh colander or colander layered with cheesecloth to catch any small bone bits.

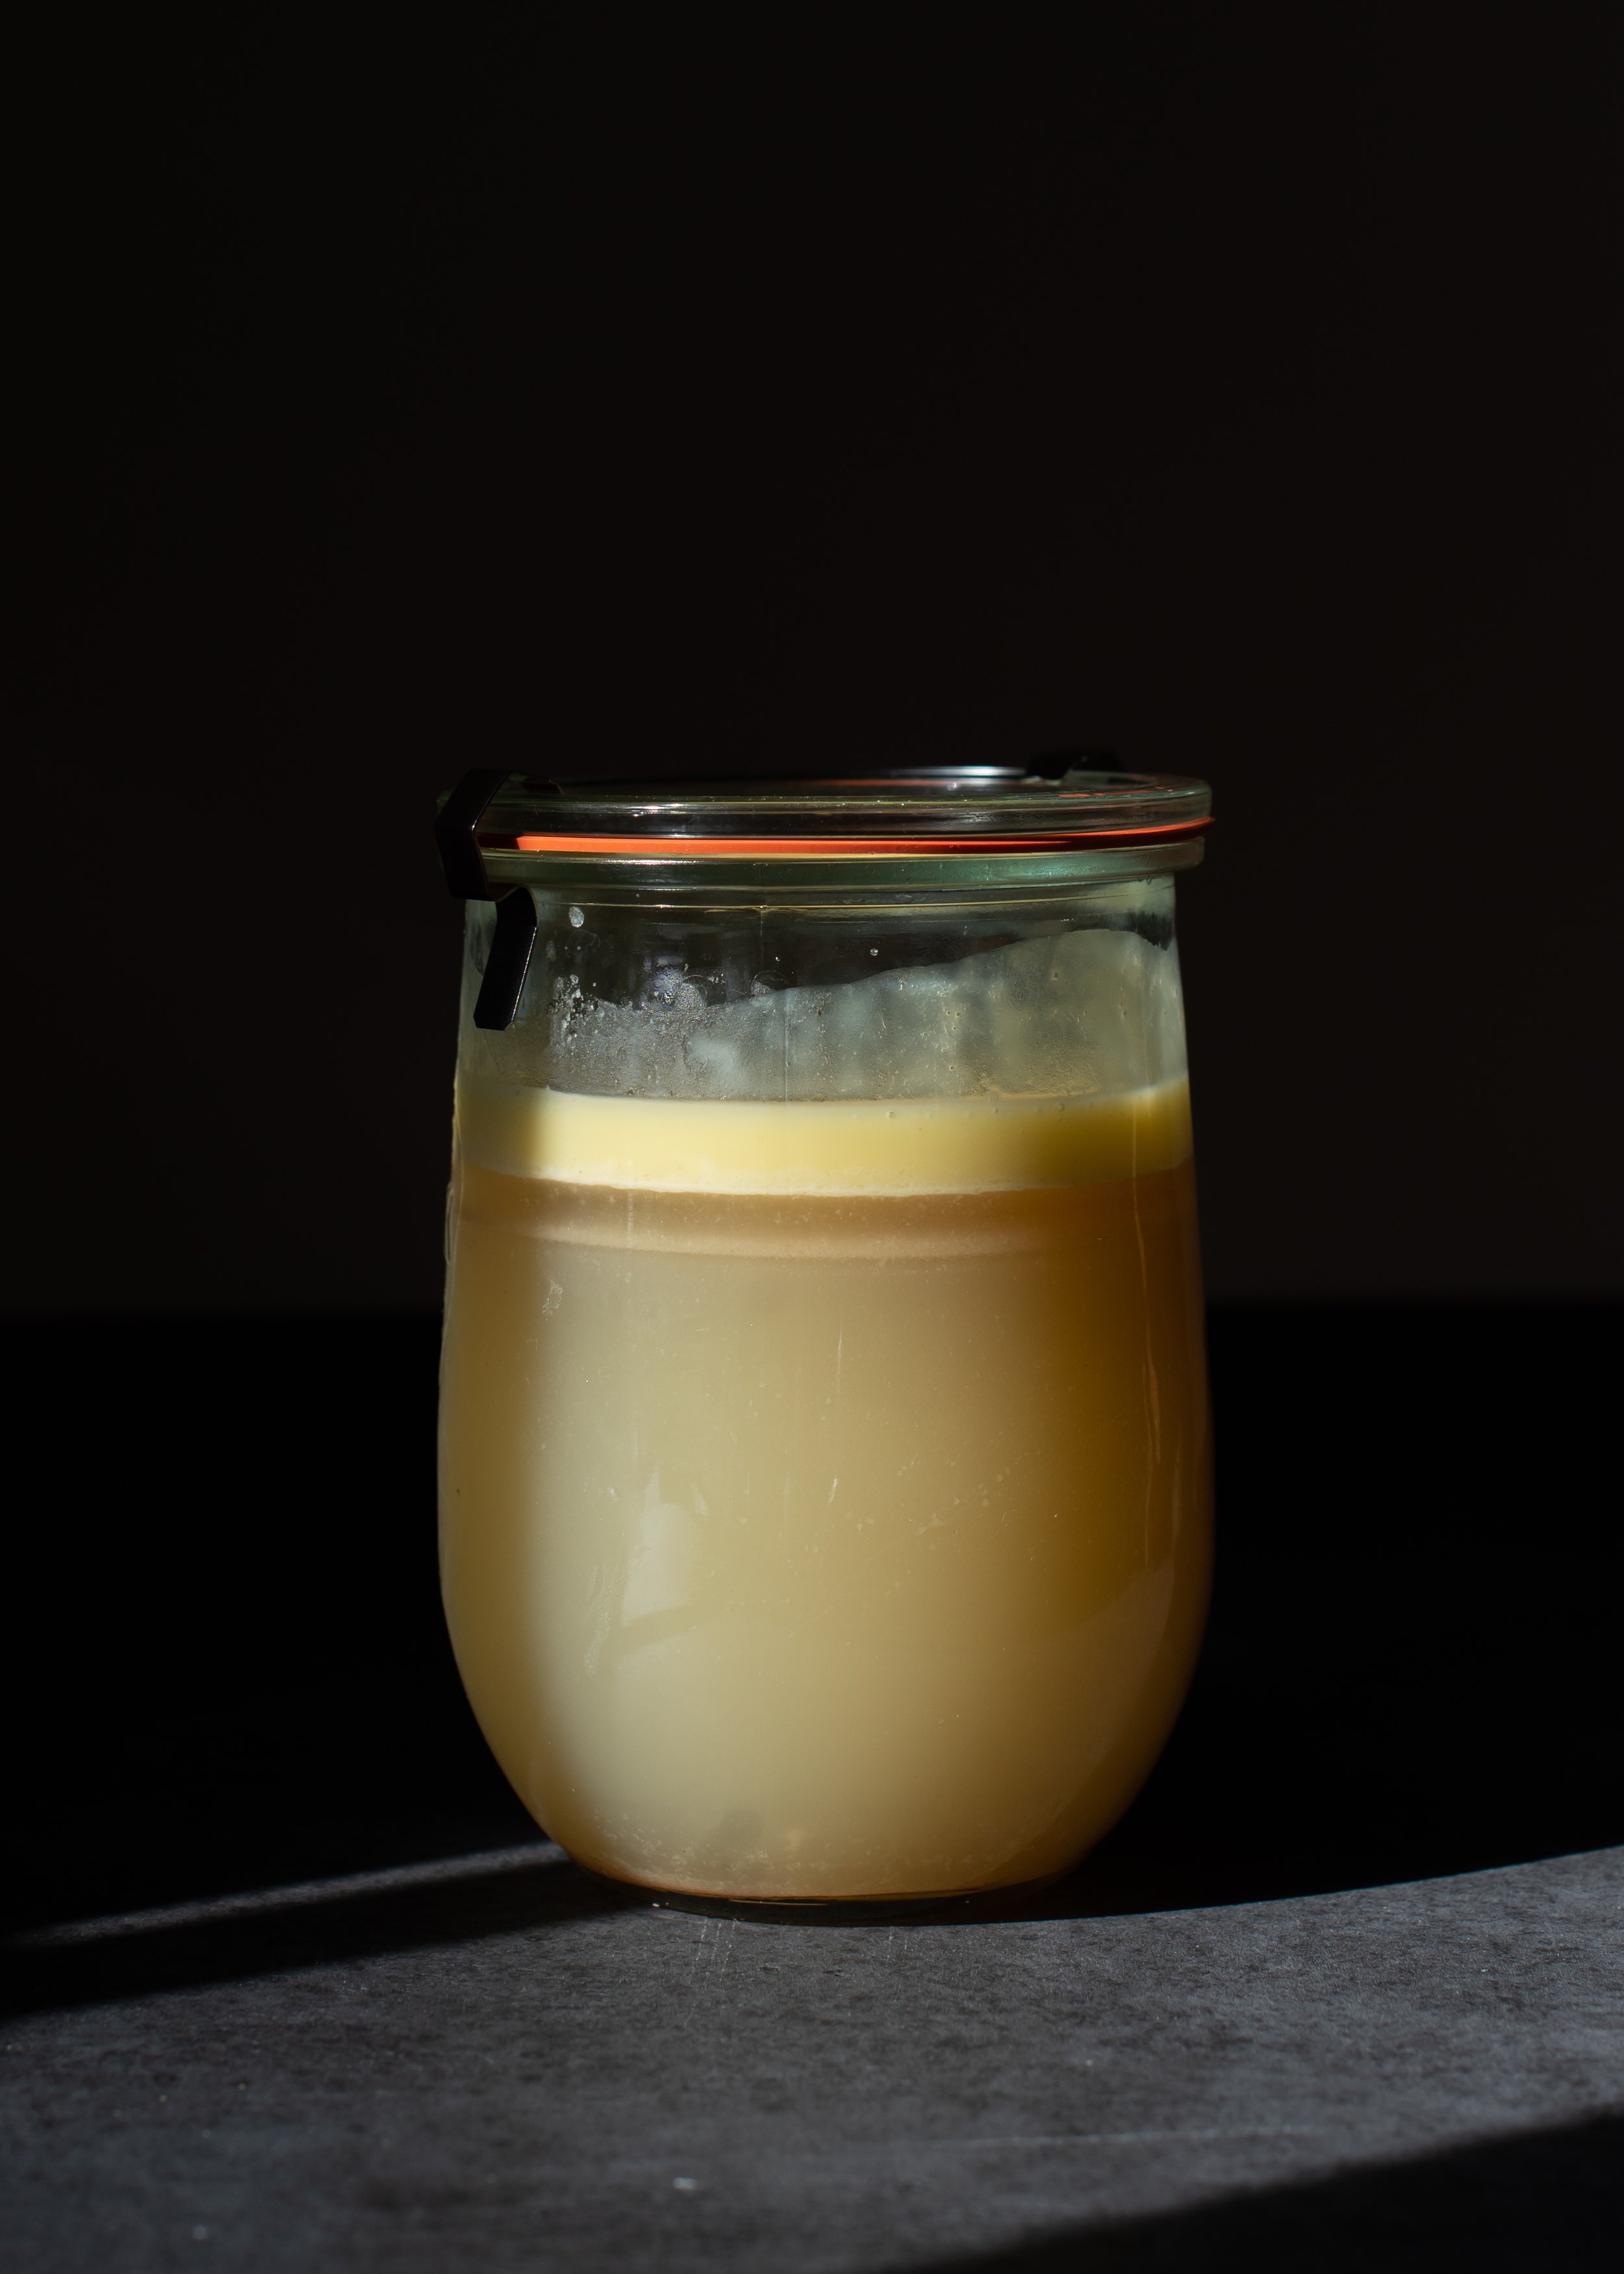
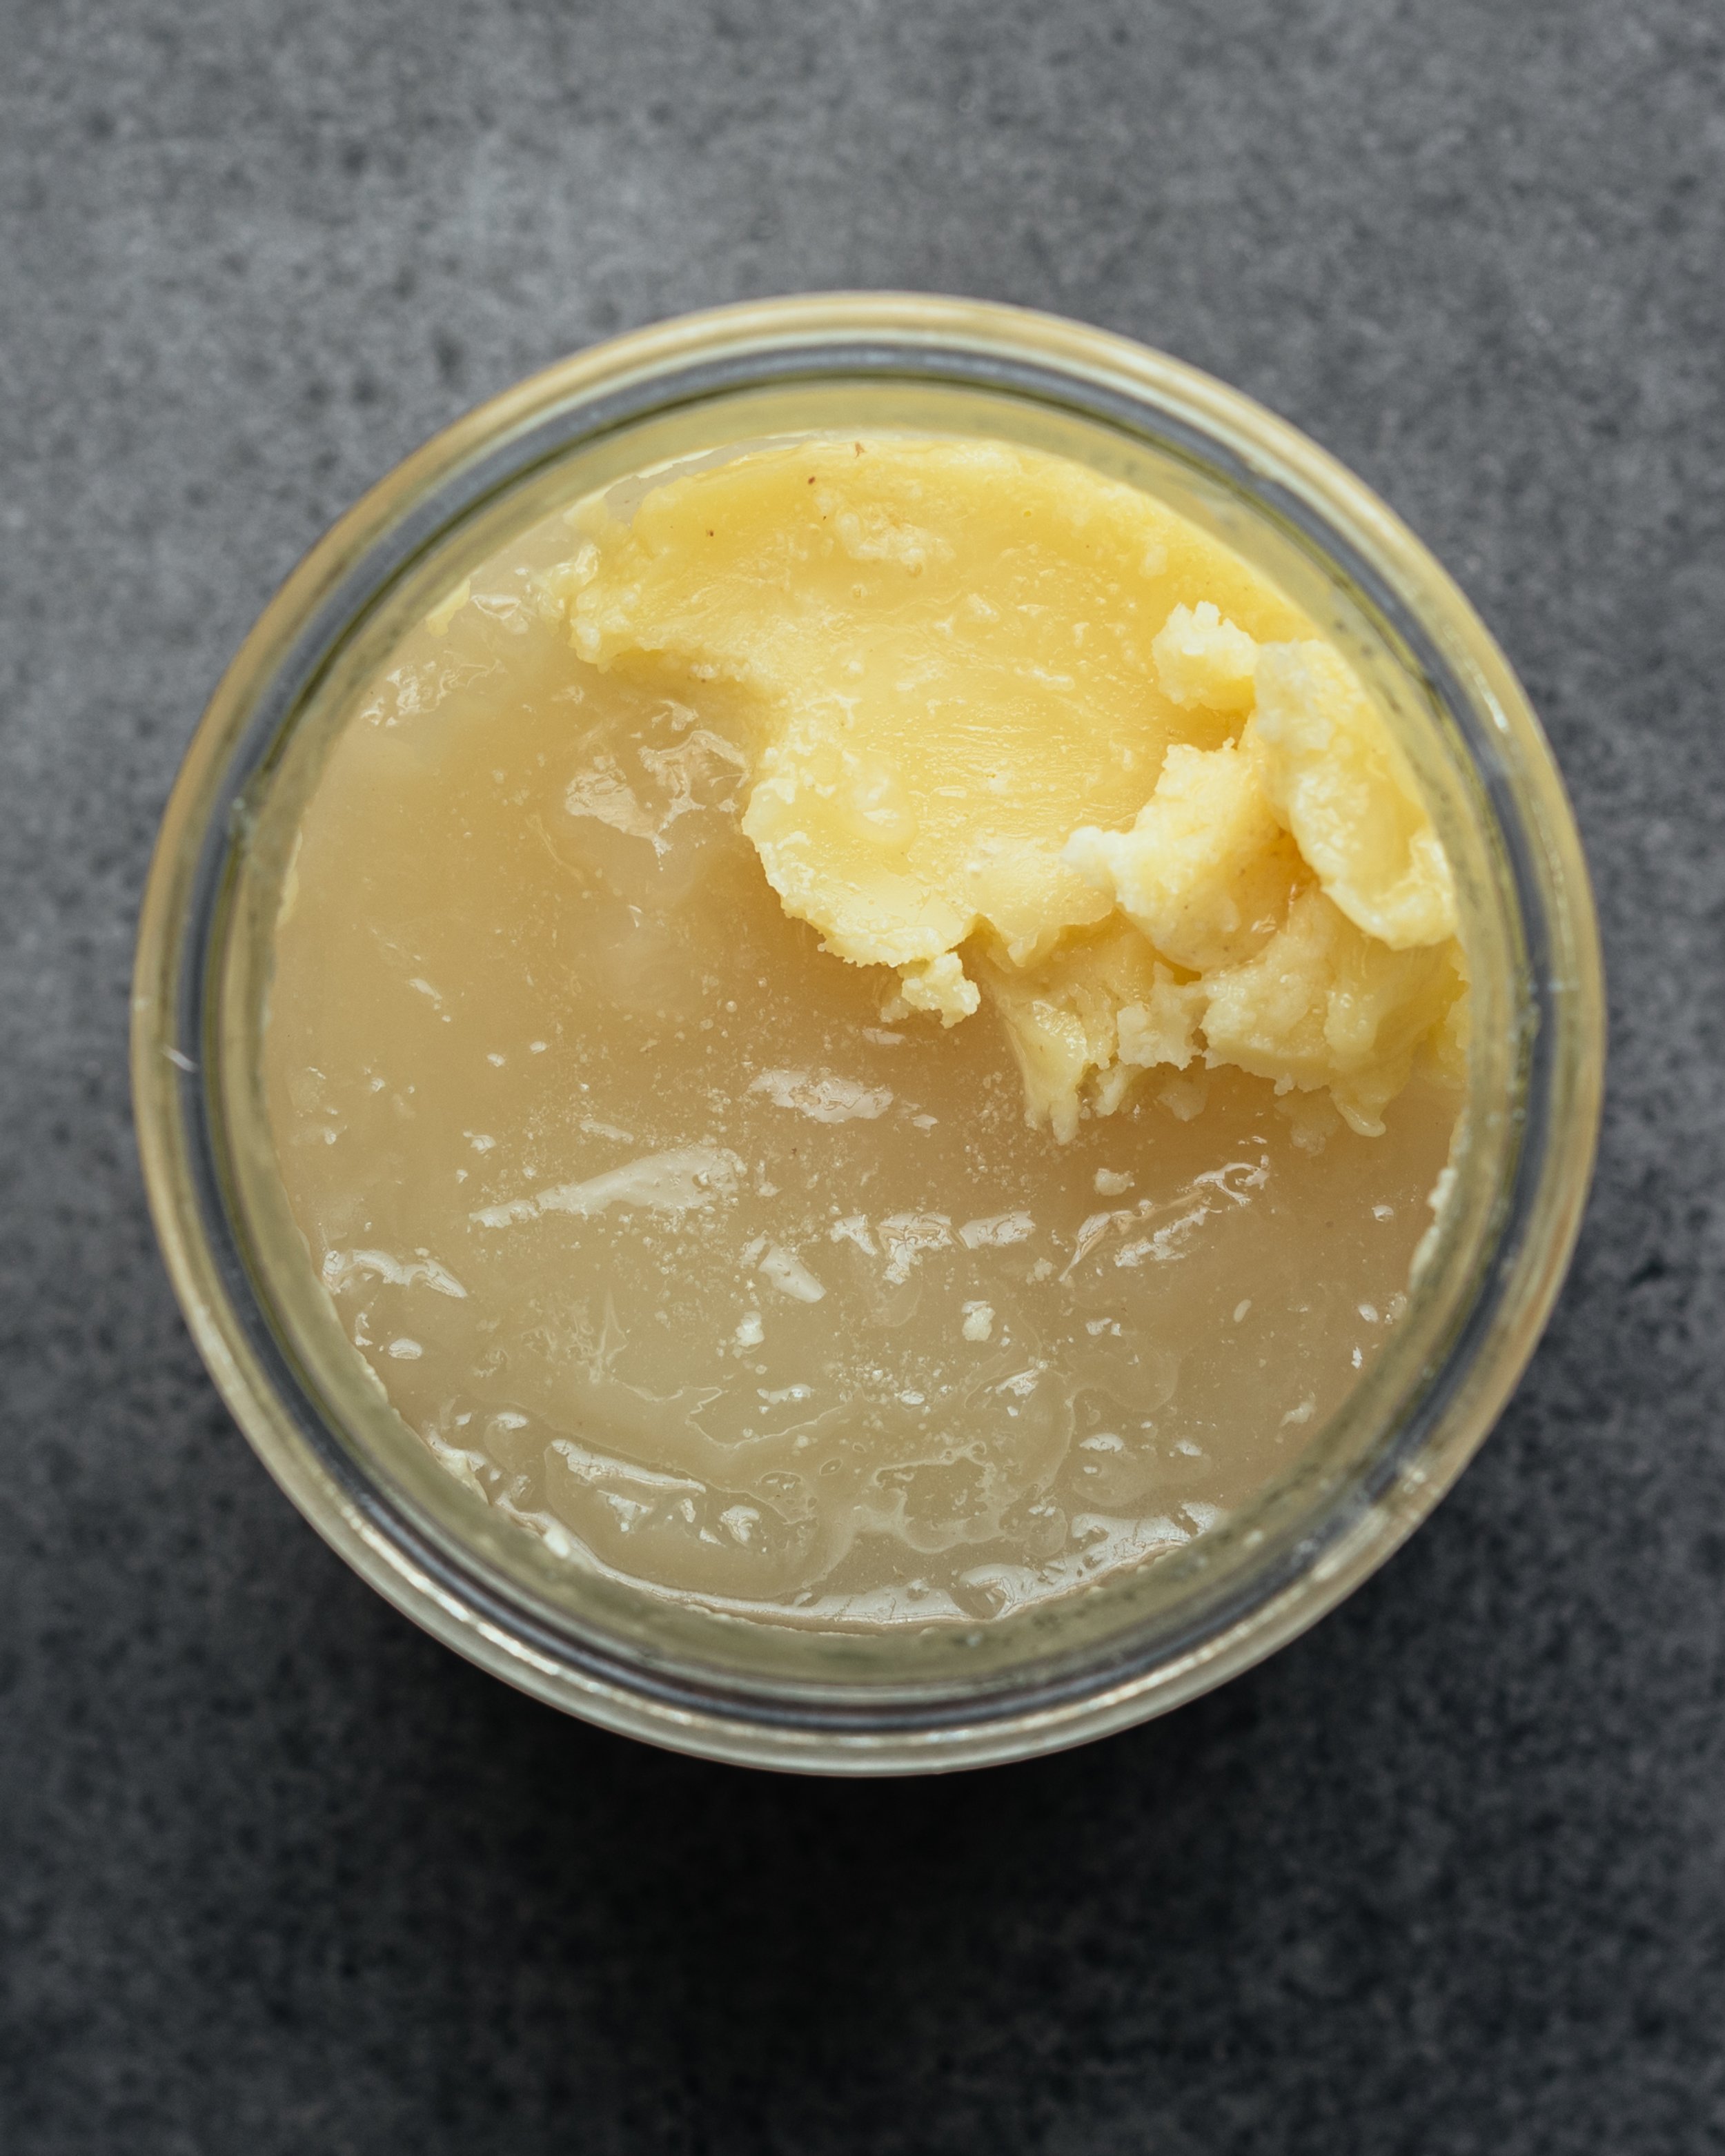
This bone broth is very concentrated. I prefer making it this way as it takes up less storage room in the freezer/fridge. You can dilute with water to drink or use in recipes as desired.

FAQs for Oven Bone Broth Recipe
WHAT IS BONE BROTH?
Bone broth is a clear, protein-dense liquid made by simmering animal bones and connective tissues such as cartilage from any animal such as chicken, beef or pork in water often along with vegetable and aromatics at a very low temperature for an extended amount of time. To me, making bone broth is a no-brainer since it is (a) nutritious (b) soothing and deeply flavourful and (c) is made with cheap (or free!) bones.
IS BONE BROTH HEALTHY?
The belief is that this ‘low and slow’ process described above extracts the collagen out of the bones and cartilage. Collagen is a protein that is rich in the amino acids glycine and proline. When collagen-rich foods are ingested, the collagen breaks down in the stomach into the amino acids to be used by the body as building blocks to make a variety of proteins including collagen. Collagen has been shown to improve elasticity and moisture in the skin, sooth gut irritation and inflammation, and improve overall joint and bone health. Bone broth is also a good source of the amino acid glutamine, which is notably important for maintaining gut barrier function. A “leaky gut” is one where the barrier “leaks” things like microorganisms, fungi, food proteins and toxins into the bloodstream, leading to inflammation and an immune response. All that said, while there is clinical evidence of the foregoing benefits of collagen, glycine, proline and glutamine, there is a lack of direct human clinical research of bone broth itself (source: Canadian digestive Health Foundation cdhf.ca). Some experts question if stomach acids break down those amino acids before they have a chance to be used by the body at all. Therefore, I take all of this with a grain of salt, and focus more on the other benefits of making bone broth which is that it is a good source of protein, it is really flavourful and so soothing to drink, and it is cheap to make at home. Any collagen / skin / hair benefits being a definite upside :)
WHY DO I CARE IF MY BONE BROTH GELS?
Apart from it’s superb flavour, bone broth is probably most prized for the presence of the protein gelatin. Gelatin is the cooked form of collagen, in this case, when bones and cartilage are simmered over a long period at a low enough heat to not completely break down the collagen. When consumed, gelatin has been associated with promoting gut health, supporting the immune system by protecting the lining of the small intestines, supporting joint health and improving the appearance of skin, hair and nails. A bone broth that solidifies like jello (gels) once chilled in the fridge indicates the presence of gelatin, hence why we love to see it!
HOW IS BONE BROTH DIFFERENT FROM STOCK? OR REGULAR BROTH?
Actually, bone broth is indeed a stock. The traditional definition of stock is a liquid made by simmering animal bones (with or without meat), vegetables and aromatics for 2-4 hours on the stove. Bone broth specifically does not contain any meat (although often there may be bits of meat attached to the bones) and is cooked over a longer period of time. Both “stock” and “bone broth” yield liquids that gels when chilled because of the presence of gelatin. Regular “broth” is made by simmering meat (with or without bones) with vegetables and aromatics in a shorter amount of time, i.e less than 2 hours, and does not gel when chilled. (sources: bonappetit, thekitchn)
WHY BOTHER MAKING BONE BROTH AT HOME?
It wasn't until I started making it myself that I realized how much more amazingly flavorful my own broth is. So much better than any store-bought broth I have access to. Store bought, high quality bone broth is super convenient but quite pricey! Not to mention, can be high in sodium. It is cheap to buy bones ($2-3/lb depending type of bone) or basically FREE if you, like me, collect every bone from every meal for bone broth. Keep it all in a freezer bag until you have enough or feel like making some.
IS IT SAFE TO COOK CHICKEN BONE BROTH AT 150F?
We need heat to extract collagen from bones and connective tissues. Collagen begins to melt at 160f and fully dissolves at 180f. That’s why a low heat is required for bone broth to gel. Extended exposure to a too-high temperature may destroy the collagen thus preventing bone broth from gelling. I set my oven to cook at 150f, which is my lowest oven setting. I know people will question using an oven temperature of 150f for chicken bone broth, when the guideline for doneness is 165f for chicken. Let me assure you, I have done my research and it is safe. Here is an excellent explanation from Thermoworks.com (the maker of Thermapen):
“most people know about 165°F (74°C), but what most people don’t know is that food safety (bacterial die-off) is a function of both temperature and time. You can achieve the exact same bacterial death by holding your chicken at lower temperatures for longer times with the exact same assurance of safety. The USDA provides guidelines for industry on food safety…to indicate how long it takes to kill enough bacteria at a given temperature.”
Based on the chart, the time needed for bacterial die-off in medium-lean chicken at 150f (65.6c) is 3 minutes. JUST 3 MINUTES. Since we are cooking this chicken bone broth for 12-24 hours, it is fair to conclude that this recipe is perfectly safe.
WHY DO YOU PREFER THIS OVEN METHOD?
As mentioned above, maintaining a low heat is important for getting the collagen out of the bones and not melting it. Cooking in the temperature-controlled environment of the oven gives me peace of mind that I won’t accidentally over boil and melt the collagen. The oven method is also ideal for people who feel apprehensive about leaving the stove top on overnight, especially people with gas burners like me. A closed-off electric oven feels a lot safer to me and I don’t need to run the fume hood the whole time either. Although my Instant Pot gets it done faster, the low and slow approach gives me the flexibility of putting it in the oven and dealing with it (straining / storing) whenever its convenient for me that day — I can leave it in the oven for anywhere between 12 to 24 hours. My stock pot also fits more than my IP, which is another plus.
Now that I’ve answered some questions that you may have had, find my recipe below along with recipe head notes!
Notes for Oven Bone Broth Recipe
1. ERR ON THE SIDE OF ADDING LESS WATER TO START: If you’re keen on getting gelatinous bone broth, err on the side of adding less water. Fill it up to an inch below the bones. In particular, I do this when I don’t have super collagen-rich bone pieces (see #2 below). Highly concentrated broth takes up less room to store or freeze. You can easily dilute with water later for drinking or for use in recipes.
2. TYPE OF BONES TO USE: When purchasing bones from the butcher, don't shy away from the collagen-rich parts like wings and necks (and feet) for chicken broth, or marrow bones, knuckles and ox tail for beef broth. That said, if I’m using bones saved from a meal (see #3 below), it tends to be thigh or leg bones which are great as well and also produce gelatin especially in combination with other parts. The bone broth pictured in this blog post was made using only raw chicken carcasses and backs plus a few cooked leg bones I had in the freezer.
3. SAVE BONES FROM HOMECOOKED MEALS: Don’t throw them away. Once the meat is pulled off and enjoyed, toss the bones into a freezer bag and freeze until I have enough or am ready to make a batch of broth. Rinse off the bones if there is a lot of sauce on them, depending on how they were cooked. Usually I mix these saved bones with fresh bones purchased at the butcher. Sometimes, my entire broth is made from saved cooked bones if that’s all I have.
4. SOAK/ REMOVE SCUM: If you are using fresh (raw) bones, I highly recommend these two preliminary steps:
Soak bones to remove blood — Soak bones in the pot filled with tap water for 15 minutes. Drain off the water. You’ll see it will be pink-tinged with blood.
Blanch bones to remove scum and impurities — see two options for doing this in the recipe
5. DO I NEED TO ROAST THE BONES? Many bone broth recipes call for roasting raw bones on a sheet pan in a 400f oven first until they get brown (how long depends on the type/size of bones being used) to extract more flavor. I rarely do this step but you can if you want!
6. WHY IS APPLE CIDER VINEGAR OPTIONAL? People swear by the addition of acid in bone broth to extract minerals such as calcium from the bones. However, studies (including one conducted by USDA) have shown bone broths contain low levels of vitamins and minerals, much of which is derived from the vegetables used rather than the bones. You can’t taste it in the final broth. I’ll leave it up to you to add or not but it doesn’t hurt to add it!
7. STRAIN: In particular when making chicken bone broth, there tends to be small bone bits that need to be strained off. Use a colander with a very fine mesh (see photo in blog post) or place three layers of cheesecloth on a colander to strain.
8. FREEZING: I don’t do canning so my go-to storage method is to freeze my broth in glass jars. Make sure to leave a good amount of head space or else it may explode as the air inside expands during freezing! I aim for about 1” head room on straight jars or just under where the glass begins to curve inward on a mason jar, no higher. I have wept over cracked containers and wasted broth. Silicon ice cube trays with large compartments are fantastic too for an assortment of smaller frozen portions to use in sauces etc.
9. DEFROSTING: When defrosting in glass jars, avoid huge swings in temperature. Even tempered glass jars can sometimes crack under temperature stress so it is safest to defrost gradually, preferably overnight in the fridge or defrost slowly in the microwave.
You may also be interested in this related post!
HOW TO MAKE BONE BROTH IN THE OVEN
Recipe makes about 8 cups of concentrated bone broth. Dilute broth with water as desired to drink or use in recipes. If you’re wondering about the food safety of cooking this chicken bone broth at 150f, read the info under FAQs (it is safe).

How To Make Bone Broth in the Oven
Ingredients
Instructions
- Preheat oven: Make sure oven rack is adjusted to fit your pot with the lid on. Preheat oven to 150 Fahrenheit (65 Celsius). If you’re wondering about the food safety of cooking chicken bone broth at 150f / 65c, read the explanation in the FAQ section of my blog post. It is safe.
- Place bones in a large stock pot. I use a 7¼ quart dutch oven which holds 6.7 litres; use a larger pot if you have as mine is very full.
- Rid the bones of scum/impurities (2 ways): OPTION 1: Fill with water and soak 10-15 minutes to release blood. Set a colander inside the sink. Dump the entire contents of the pot (bones and water) into the colander. Return bones to pot and fill again with 8 to 9 cups of tap water, more or less that it comes up to just below the level to cover the bones in the pot (doesn't need to fully cover). Set on top of stove, cover and bring to a rolling boil. Blanch bones at a steady boil for 10 minutes, skimming and discarding the grey scum as it emerges. This usually happens during the first 10 minutes of boiling. Try not to skim off the oil – that’s good for flavour and for storing the broth. The oil can always be skimmed off later. OPTION 2: Instead of soaking, cover the pot and bring the pot of bones to a boil right away. Once at a boil, continue on a strong simmer for 10 minutes to bring out all the scum. Set a colander inside the sink. Dump the entire contents of the pot (bones and water) into the colander. Wash the pot and return the boiled bones to the pot. Fill pot again with 8-9 cups of tap water to reach just below the top of the bones but not fully cover (this amount of water yields a concentrated broth).
- Add remaining ingredients and return to a boil: After scum has been cleared using one of the two methods above, make room and place celery stalks, carrot, onions and garlic cloves into the pot. Add apple cider vinegar if using. Cover and bring back to a boil. As soon as it has reached a rolling boil, cover with lid and turn heat off.
- Cook in 150f/65c oven: Place pot in preheated oven. Cook for anywhere between 12-24 hours, whatever is more convenient.
- Strain: Set a fine-mesh sieve over a large bowl or pot. Strain bone broth over the sieve. If you don’t have one with a very fine mesh, place a double or triple layer of cheesecloth over your colander to catch any fine bone bits. Let the solids sit for a few minutes to let gravity do the work of draining some liquid through, then push gently on the solids to release as much liquid as possible. Discard solids. Don’t be alarmed by the small yield as it is very concentrated. I prefer it concentrated as it takes up less storage room in the fridge or freezer and you can simply dilute with water to drink or use in recipes as desired.
- Store: Use right away or transfer strained bone broth into storage jars/containers and refrigerate or freeze promptly after it has cooled to room temperature.
- Freeze: If you plan to freeze the broth, make sure to use freezer-safe jars or containers and leave sufficient headroom for expansion during freezing. Glass jars will crack if there isn't sufficient head room and you will cry devastating tears (see note 8). Bone broth freezes well for 2 to 3 months. See note 9 for defrosting.
Notes
1. Err on less water to start: If you’re keen on getting gelatinous bone broth, err on the side of adding less water. Fill it up to an inch below the bones. In particular, I do this when I don’t have super collagen-rich bone pieces (see #2 below). Highly concentrated broth takes up less room to store or freeze. You can easily dilute with water later for drinking or for use in recipes.
2. Type of bones to use: When purchasing bones from the butcher, don't shy away from the collagen-rich parts like chicken feet, wings and necks for chicken broth, or marrow bones, knuckles and ox tail for beef broth. That said, if I’m using bones saved from a meal (see #3 below), it tends to be thigh or leg bones which are great as well and also produce gelatin especially in combination with other parts. The bone broth pictured in this blog post was made using raw chicken carcasses and backs plus a few cooked leg bones I had in the freezer.
3. Save bones from meals: Don’t throw them away. Once the meat is pulled off and enjoyed, I toss the bones into a ziptop freezer bag and freeze until I have enough or am ready to make a batch of broth. Rinse off the bones if there is a lot of sauce on them, depending on how they were cooked. Usually I mix these saved bones with fresh bones purchased at the butcher. Sometimes, my entire broth is made from saved cooked bones if that’s all I have.
4. Soak/remove scum: If you are using fresh (raw) bones, I highly recommend these two preliminary steps:
- Soak bones to remove blood — Soak bones in the pot filled with tap water for 15 minutes. Drain off the water. You’ll see it will be pink-tinged with blood.
- Blanch bones to remove scum and impurities — see two options for doing this in the recipe
5. Should I roast the bones first? Many bone broth recipes call for roasting raw bones on a sheet pan in a 400f oven first until they get brown (how long depends on the type/size of bones being used) to extract more flavor. I rarely do this step but you can if you want!
6. Why is apple cider vinegar optional? People swear by the addition of acid in bone broth to extract minerals such as calcium from the bones. However, studies (including one conducted by USDA) have shown bone broths contain low levels of vitamins and minerals, much of which is derived from the vegetables used rather than the bones. You can’t taste it in the final broth. I’ll leave it up to you to add or not but it doesn’t hurt to add it!
7. Strain: In particular when making chicken bone broth, there tends to be small bone bits that need to be strained off. Use a colander with a very fine mesh (see photo in blog post) or place three layers of cheesecloth on a colander to strain.
8. Freezing: I don’t do canning so my go-to storage method is to freeze my broth in glass jars. Make sure to leave a good amount of head space or else it may explode as the air inside expands during freezing! I aim for about 1” head room on straight jars or just under where the glass begins to curve inward on a mason jar, no higher. I have wept over cracked containers and wasted broth. Silicon ice cube trays with large compartments are fantastic too for an assortment of smaller frozen portions to use in sauces etc.
9. Defrosting: When defrosting in glass jars, avoid huge swings in temperature. Even tempered glass jars can sometimes crack under temperature stress so it is safest to defrost gradually, preferably overnight in the fridge or defrost slowly in the microwave.
Disclaimer: nutritional information is auto-generated and should only be used as an approximation.


We love homemade bone broth with wontons or noodles.

Do you have trouble getting your bone broth to gel? Have you ever heard of (or made) bone broth in the oven? Do you have any bone broth tips to share with me? If you make this recipe, I wanna hear all about it too or tag me on Instagram so I can see!